There are many common approaches to logging. However, since my home environment is running SecurityOnion (SO), I’m going to focus on three common ones and show how to do an end-to-end configuration with SO. If you’re curious about Filebeat, I’ve already written about it here.
Fluentd
Fluentd is extremely popular, while providing many options and granular configuration. That said, it’s also more work to get started as opposed to the other options that we’ll discuss.
To get this working you will need to do a few things on the Security Onion side:
- Configure an Elastic role with minimal permissions to allow event ingestion.
- Create an Elastic user and assign to the newly created role.
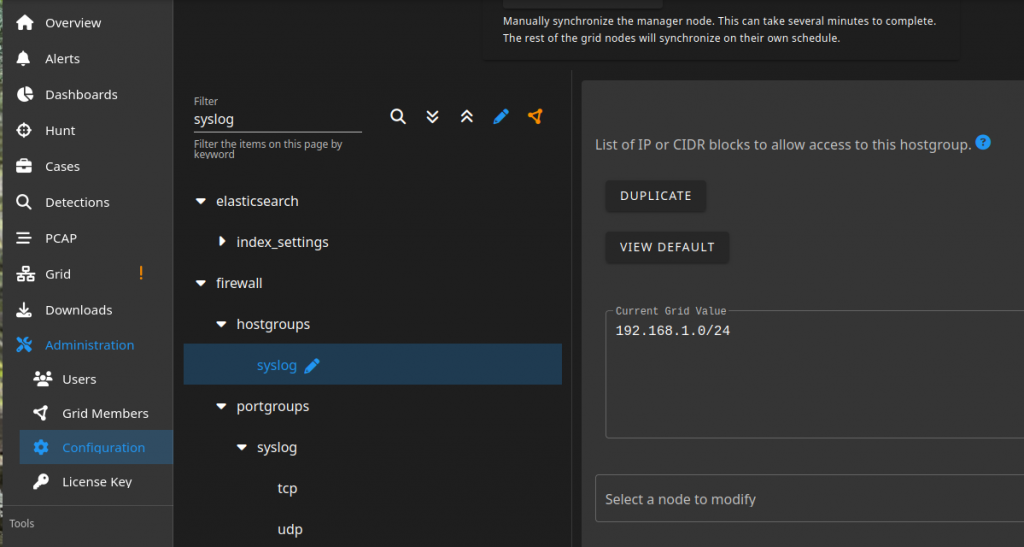
- Open up the SO firewall to allow Elasticsearch on port 9200. This is accomplished using the Administration > Configuration > Firewall settings.
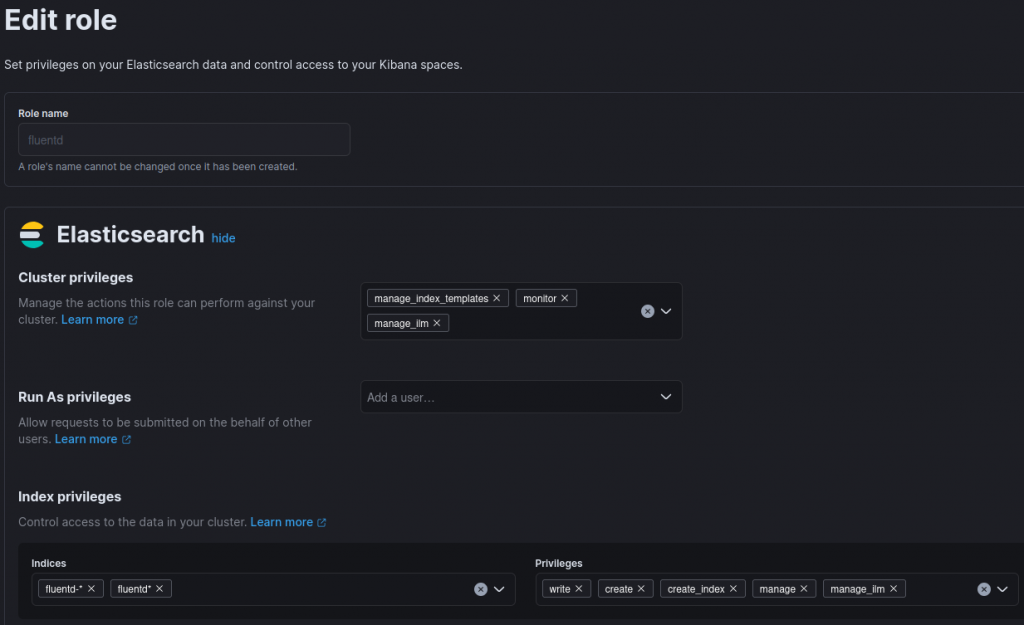
Here’s the role definition, with associated permissions.
You can now deploy your Fluentd agent. I’m using Ubuntu in this example.
# Download the binary
wget https://s3.amazonaws.com/packages.treasuredata.com/lts/5/ubuntu/jammy/pool/contrib/f/fluent-package/fluent-package_5.0.5-1_amd64.deb

# Install Fluentd, which becomes the fluend.service
sudo dpkg -i fluent-package_5.0.5-1_amd64.deb

# Create the td-agent directory to store position files
sudo mkdir /var/log/td-agent
sudo chown _fluentd:_fluentd /var/log/td-agent/

# Grant the _fluentd user access to read system log files as part of the adm group
sudo usermod _fluentd -aG adm
Next, we need to configure Fluentd (/etc/fluentd/fluentd.conf). Here’s a working configuration.
<system>
  log_level error
</system>

<source>
  @type tail
  path /var/log/syslog
  pos_file /var/log/td-agent/syslog.pos
  tag system.log
  <parse>
    @type syslog
    keep_time_key true
  </parse>
</source>

<source>
  @type tail
  path /var/log/auth.log
  pos_file /var/log/td-agent/auth.pos
  tag system.auth
  <parse>
    @type syslog
    keep_time_key true
  </parse>
</source>

<filter system.log>
  @type record_transformer
  <record>
    file_location "/var/log/syslog"
  </record>
</filter>

<filter system.auth>
  @type record_transformer
  <record>
    file_location "/var/log/auth.log"
    security_event "true"
  </record>
</filter>

# The timestamp for syslog doesn't work, as there isn't a year.  The below is a quick workaround to append a new, slightly less accurate timestamp that allows SO to parse it and show time-series data.
<filter system.*>
  @type record_transformer
  enable_ruby true
  <record>
    timestamp ${Time.now.utc.iso8601}
  </record>
</filter>

## DOCS: https://docs.fluentd.org/output/elasticsearch
<match system.* wazuh.*>
  @type elasticsearch
  host sec-onion-master.server.com
  port 9200
  # This causes it to break, because the permissions are required on the logstash index
  # logstash_format true
  user "filebeat_user"
  password "L0gging123!"
  scheme https
  reconnect_on_error true
  index_name "fluentd-"
  <buffer tag, time>
    flush_interval 60s
    timekey 1m
    timekey_wait 1m
  </buffer>
  ssl_verify false
</match>
When you run into issues you can view the troubleshooting logs at /var/log/fluent/fluentd.log. However, be cautioned, often it’s not very informative, even at a debug log level.
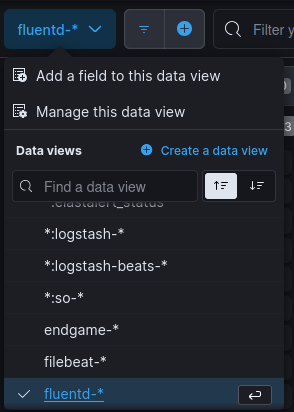
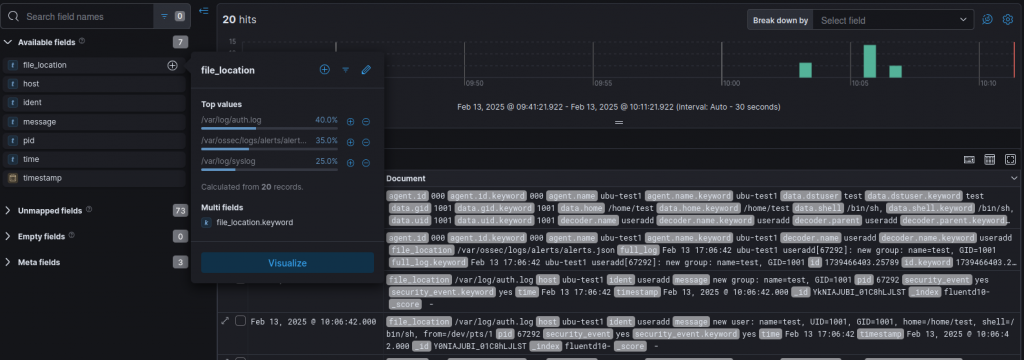
Once things are working, you should be able to create a new Data View against the index_name that you specified in the above file. This should then show you your incoming logs.
rSyslog
Syslog has been around for a long time, and in my experience is primarily used by networking devices to send events. However, it’s still fully supported to use on a client OS.
First, open the firewall.
Once this is opened, you can update the /etc/rsyslog/rsyslog.conf file to begin forwarding log events.
# /etc/rsyslog.conf configuration file for rsyslog
#
# For more information install rsyslog-doc and see
# /usr/share/doc/rsyslog-doc/html/configuration/index.html
#
# Default logging rules can be found in /etc/rsyslog.d/50-default.conf


#################
#### MODULES ####
#################

module(load="imuxsock") # provides support for local system logging
module(load="imklog" permitnonkernelfacility="on")

###########################
#### GLOBAL DIRECTIVES ####
###########################

$ActionFileDefaultTemplate RSYSLOG_TraditionalFileFormat
$RepeatedMsgReduction on

#
# Set the default permissions for all log files.
#
$FileOwner syslog
$FileGroup adm
$FileCreateMode 0640
$DirCreateMode 0755
$Umask 0022
$PrivDropToUser syslog
$PrivDropToGroup syslog

$WorkDirectory /var/spool/rsyslog

$IncludeConfig /etc/rsyslog.d/*.conf

# Add in your Security Onion Server here:
*.* @@sec-onion-master.server.com:514
All the incoming logs (which can be configured via the files in /etc/rsyslog.d/) will show up in the logs-* view, and can easily be filtered using the data_stream.dataset = syslog parameter.

That’s it! Now you have three different methods to forward logs to your Security Onion (or other Elastic-based) server.